Migration from .Net Framework MVC to Blazor WebAssembly
One of the reasons why companies are stuck with old frameworks is how hard it is for them to migrate to a new one. Many factors can contribute to this:
- One is that they invested so much in their current product that once it satisfies the business needs, it is out of the question to touch it only for the sake of using a brand-new framework; you know, the adage: “If it works, don’t touch it.”
- Another reason is that they use many platform-specific constructs across all parts of the code base, so everything falls apart when those constructs are unavailable in a newer platform version. I could cite many reasons why migrating legacy software products is challenging. Still, very often, it boils down to this fact: they were designed without considering changes in the first place. A lot has been written on the subject, so I won’t dwell any further on how to develop software for change; you can find more about this by a simple Google search of the keywords: Clean Code, SOLID principles, Clean Architecture, Refactoring, and so on.
Conversely, what could lead a company to migrate the framework they use to construct their product? Well, there aren’t so many reasons. Here are a few:
Security Compliance
If there is only one reason to migrate, it is this one. It’s because a security breach will cost a lot more to the company than the budget to migrate to a more recent version of the framework that implements the latest security standard available on the market. Also, framework vendors only offer support for the current versions of their products. So, to benefit from vendor support, it’s wiser to migrate to the latest version. You know, the story of Long-Term Support (LTS) and Standard Support.
Development of significant new features
Adding significant changes to the product is also an excellent opportunity to migrate. That way, we mix the migration budget with the new features budget, which can reduce costs overall.
Migrating from .Net Framework MVC to Blazor Webassembly
Let’s talk about the very subject of this blog post: migrating legacy websites created with the .Net framework MVC to Blazor WebAssembly.
Before we begin, note the terms I use in this blog post (and eventually in any of my other posts). Regarding .Net Framework, I mean the .Net version pre-core: the 4.x versions. I will use the still-common term .Net Core to refer to the versions that come after. Even if the recent framework versions ditch the “core” part, I guess it’s still convenient when confronting the new versions to the old ones in the same discussion.
Migration Strategy
When it comes to migrating legacy software, two approaches are possible:
- Abrupt Migration
It consists of redeveloping all the application features with the new framework. Then, when every component has been developed and deployed, the production website will point to the brand-new version.
As you may guess, this risky approach implies a considerable cost and is only suitable for small applications, provided those applications are well-structured. So, for most applications that businesses rely on for their operation, an incremental approach is the way to go.
- Incremental or Smooth Migration
It consists of migrating the application to the new framework one subset at a time. Only a subset of the application will be migrated for each iteration.
It implies that components developed with the new framework must integrate seamlessly into the parts designed with the old one. When navigating the website, we won’t know which framework the current page was created.
Challenge
Now we have this challenge: How can we seamlessly integrate Blazor components with a web application created with .Net Framework MVC? As you know, Blazor was designed to run natively with .Net Core hosts. Still, a simple Google search will reveal that some people succeed in making a Blazor WebAssembly component work inside a page served by .Net Framework MVC. Most of their methods boil down to the following steps:
- Create a Blazor Webassembly application project, where we develop all the new Blazor components.
- Add a post-build event to this project. It will copy the artifact folder
_frameworkto the root directory of the .Net Framework MVC project. - Add a
<div id="app" component="ComponentType"></div>in any MVC page where we want to add a Blazor component that has a type ComponentType. - Add a reference to the script
blazor.webassembly.json the MVC razor page. - In the Blazor Project, modify the
App.razorroot component to render the previous component dynamically. - Add rules to
web.configto allow the DLLs and other files in the_frameworkfolder to be loaded as static files by the browsers. - When we launch the MVC application and navigate to the page where we put the Blazor component, we see that it is rendered correctly, and we can interact with it. Also, when we inspect the Network tab in the browser’s dev tool, we find that all the DLL files inside the
_frameworkartifact folder are loaded as static files for each page load.
You can follow the above steps in this great and informative article.
Even if the methods involving the above steps could work, I’m reluctant to adopt them as a basis for the migration. These are the reasons :
- First of all, the artifact copying step.
Whenever we need to copy something and then paste it to another location in our software development routine, we should always ask ourselves what could go wrong and whether it is worth it. You might tell me that any build process needs copy-pasting to a specific artifact directory to satisfy the application’s dependencies; I agree. But here is the catch: We are copying the artifact to the root directory of the MVC project (not even to its artifact directory) so that it considers the files inside it as static contents. For this to be possible, we had to tweak the web.config to allow them to be sent to the client. As you might guess, it smells of security concerns, which is a big one for a security issue! Do you know that leaving the X-Server HTTP headers to be sent to the client browser gives us a big red high-priority alert during a security test? Well, I will let you guess what kind of alert we will get if we send a bunch of DLLs together with the web page response. This reason alone can make us not consider this approach. As I said in the introductory section, one reason a company would migrate its product to a new framework is Security Compliance; I don’t think that the above approach allows us to achieve this.
- Removing Blazor routing capability is problematic, too.
If we decide to use Blazor WebAssembly, it should be for using it at its full potential. That is, taking advantage of all its features, one of which is client-side navigation. That way, we should be capable of navigating through pages that have already been migrated with client-side navigation alone, without page reload. Our goal is to migrate to Blazor WebAssembly; as such, it is crucial not to deprive ourselves of its full potential.
- Debuggability
Another major issue with this approach is the debuggability of the resulting solution; it is tough to debug! If a software project is hard to debug, it’s Game Over! Come on; you don’t want to go back to the age of PHP Dump, whereby you print every output of any suspicious code, do you?
Stop and think
One important lesson I learned throughout my software developer career is this: “Don’t fight the framework!”. The point of using a framework to develop software is to make our lives easier, and they can only achieve this if we provide minimum requirements for them to function; otherwise, we tend to overcome those requirements with hacks, and that is fighting the framework. In doing so, instead of making our lives easier, the framework combined with the little hacks might make our lives harder.
In our case, the minimum requirement for Blazor WebAssembly for us to build a sustainable software solution is .Net Core. Failure to satisfy this requirement is fighting the framework if we persist in using it anyway. The more accurate question is not whether we can integrate Blazor WebAssembly in a .Net Framework MVC project; it is whether we can develop a sustainable software solution with Blazor WebAssembly without .Net Core! To convince you, try to copy the _framework folder to a static website project and add a reference to the blazor.webassembly.js file in any HTML file, and don’t forget to add the div tag with id "app”; you will find that the page renders the component correctly! But with the caveat that I mentioned previously.
You might tell me: “Hey Sami, are you kidding me? I’ve followed along till here, and now you say that integrating Blazor Webassembly in .Net Framework MVC is fighting the framework?!” I know, I know, you’re right. Just sit back, relax, and keep reading. Everything will make sense at the end of this blog post.
Back to the basics and embrace the framework
So, what options remain for our migration?
When confronted with such challenging situations, I do what I like the most in software engineering: go back to basics and learn from those who know the framework the most. And who knows the framework the most? The vendor, of course! In our case, it’s Microsoft.
After searching through Microsoft .Net documentation, I landed on a page explaining how to migrate a legacy .Net Framework project to the current .Net versions; you can find more about this here. As we might expect, Microsoft recommends incremental migration for most cases. In doing so, they propose the topology below to migrate the features to the .Net Core solution:
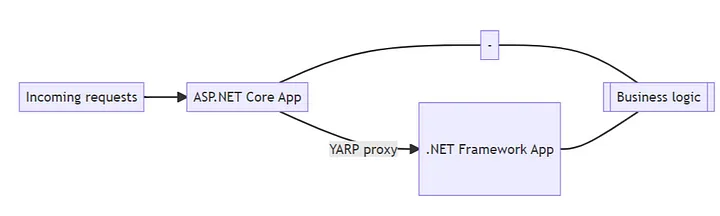
The game changer is the YARP reverse proxy installed as a Nuget package in the .Net Core app. You can learn more about reverse proxies in this nice video.
With this configuration, every incoming request passes through the .Net Core app. If a route is not found at this level, it is forwarded to the legacy site, which will process the request as usual and return the response to the .Net Core app, which produces the response to the client.
In other words, we are now accessing the legacy .Net Framework MVC site through .Net Core! And bingo, we have our ingredient to use Blazor WebAssembly as it should!
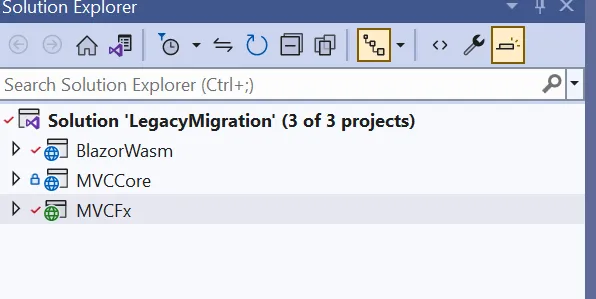
Ok, let’s implement this strategy. Fire up Visual Studio and create three projects:
- BlazorWasm is our Blazor WebAssembly app,
- MVCCore is our .Net Core app,
- MVCFx is our legacy .Net Framework MVC app.
If you have the latest version of Visual Studio, chances are that the template for .Net Framework MVC is unavailable on the list of project templates. If so, there is no need to worry; scroll to the bottom, click Install more tools and features, and install the template there.

Once the projects are created, our solution explorer should look like the one below.
Now, we need to find a way to integrate the Blazor WebAssembly application into the .Net Core application. There is no need to look elsewhere since that is exactly one of the hosting models of Blazor WebAssembly, which is to be hosted inside a .Net Core application! All we need to do is to install one Nuget package and configure a few middlewares, and bam! Our Blazor application is hosted in our .Net Core App. Isn’t that nice? 😃
To do so, in the MVCCore project:
- Add a project reference to the BlazorWasm project;
- Install the WebAssembly Server package:
Install-Package Microsoft.AspNetCore.Components.WebAssembly.Server- In the
Program.csfile, activate WebAssemblyDebugging for Dev mode and activate BlazorFrameworkFiles middleware, which, as its name implies, is responsible for serving the files BlazorWebassembly needs to function client-side:
// [MVC Core] Program.cs
// ...
if (app.Environment.IsDevelopment())
{
    app.UseWebAssemblyDebugging();
}

app.UseBlazorFrameworkFiles();

// ...
To allow debugging, add the inspectUri field to the launchSettings.json for each profile:
// [MVCCore] launchSettings.json{
"profiles": {
"http": {
"commandName": "Project",
"dotnetRunMessages": true,
"launchBrowser": true,
"inspectUri": "{wsProtocol}://{url.hostname}:{url.port}/_framework/debug/ws-proxy?browser={browserInspectUri}",
"applicationUrl": "http://localhost:5027",
"environmentVariables": {
"ASPNETCORE_ENVIRONMENT": "Development"
}
},
"https": {
"commandName": "Project",
"dotnetRunMessages": true,
"launchBrowser": true,
"inspectUri": "{wsProtocol}://{url.hostname}:{url.port}/_framework/debug/ws-proxy?browser={browserInspectUri}",
"applicationUrl": "https://localhost:7020;http://localhost:5027",
"environmentVariables": {
"ASPNETCORE_ENVIRONMENT": "Development"
}
},
"IIS Express": {
"commandName": "IISExpress",
"launchBrowser": true,
"environmentVariables": {
"ASPNETCORE_ENVIRONMENT": "Development"
}
}
}
}Again, in the MVCCore project:
- Install YARP reverse proxy package
Install-Package Yarp.ReverseProxy- Activate YARP reverse proxy middleware
// [MVCCore] Program.cs

builder.Services.AddReverseProxy()
                .LoadFromConfig(builder.Configuration.GetSection("ReverseProxy"));

//...

app.MapReverseProxy();
Add Reverse Proxy configuration to the appsettings.Development.json file:
{
  "Logging": {
    "LogLevel": {
      "Default": "Information",
      "Microsoft.AspNetCore": "Warning"
    }
  },
  "ReverseProxy": {
    "Routes": {
      "route1": {
        "ClusterId": "cluster1",
        "Match": {
          "Path": "{**catch-all}"
        }
      }
    },
    "Clusters": {
      "cluster1": {
        "Destinations": {
          "destination1": {
            "Address": "https://localhost:44344/" # Your MVCFx URL here
          }
        }
      }
    }
  }
}
The above setting says: “For any route that MVCCore cannot resolve, forward it to the MVCFx application.”
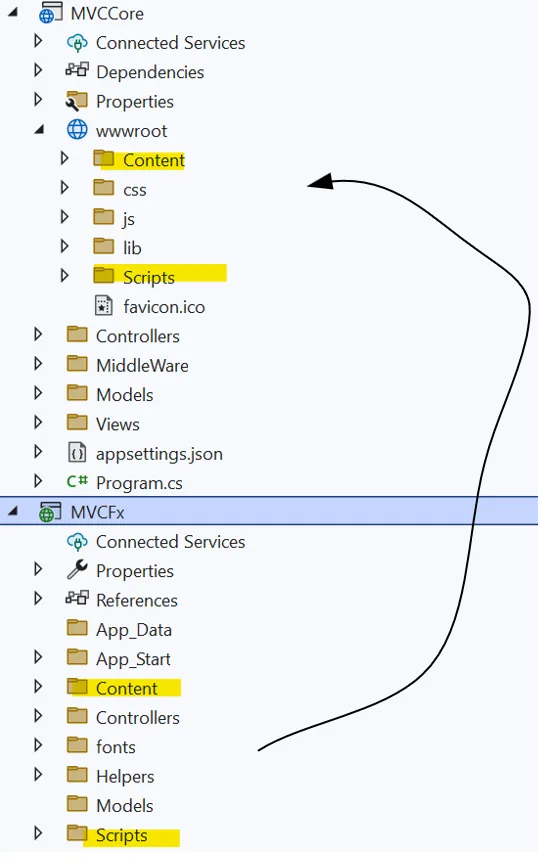
To make the MVCFx assets (Content and Scripts) available when accessing it through MVCCore, we need to copy them to the wwwroot folder of MVCCore. It is OK since those are static contents, commonly accessed as such. We need to make sure that they are in sync between both projects.
In the MVCFx project, we need a way to activate and deactivate Blazor WebAssembly for any specific page. To do so, we turn into our old friend ViewBag and check a property we’ll call Blazor, which can be true or false, and we set this flag to true for any page we want to migrate to Blazor WebAssembly. In the _Layout.cshtml, we will check this flag to render the script referencing blazor.webassembly.js.
// [MVCFx] _Layout.cshtml
@if (ViewBag.Blazor != null && ViewBag.Blazor)
{
    <script src="_framework/blazor.webassembly.js"></script>
}
Next, what we need to do is to add the <div id="app"></div> to any MVC page that we need to migrate to Blazor WebAssembly and set the ViewBag.Blazor flag to true. Also, in the Blazor WebAssembly project, we created the corresponding page and made sure the @page route is the same as the path to access the MVC page.
Suppose we want to migrate the Contact page so that instead of displaying the contacts, it will show our famous Blazor Counter page.
In the MVCFx Contact.cshtml page:
//[MVCFx] Contact.cshtml  (path: /Home/Contact)
@{
    ViewBag.Title = "Counter";
    ViewBag.Blazor = true;
}
<div id="app">
    <div class="loading-progress-text">Loading ...</div>
</div>
In the BlazorWasm Counter.razor page:
// [BlazorWasm] Counter.razor

@page "/home/contact"  // Make sure this match with the MVCFx page

@inject HttpClient Http

<PageTitle>Counter</PageTitle>

<h1>Counter</h1>

<p role="status">Current count: @currentCount</p>

<button class="btn btn-primary" @onclick="IncrementCount">Increment</button>
<button class="btn btn-primary" @onclick="CallWs">Call Web Service</button>

@code {
    private int currentCount = 0;


    private void IncrementCount()
    {
        currentCount = currentCount+1;
    }

    private async Task CallWs()
    {
        var response = await Http.GetAsync("/api/coolservice/giveme");
        Console.WriteLine(await response.Content.ReadAsStringAsync());
    }
One final change to be made to the BlazorWasm project:
- In the
MainLayout.razorcomponent, remove all HML elements surrounding the body since, for now, all fixed parts are to be provided by MVCFx. As the migration goes on, we will add some fixed elements.
// [BlazorWasm] MainLayout.razor

@inherits LayoutComponentBase

@Body- To avoid being redirected to the Blazor Index.razor page when we click on the Home link while on a Blazor Page, we must ensure that its page directive is not “/” anymore. We may also delete it since it is of no use for now. Our home page is still the MVCFx one.
// [BlazorWasm] Index.razor

@page "/blazor-index" // To avoid that we are redirected to this page when we click on a Home link

<PageTitle>Index</PageTitle>

<h1>Hello, world!</h1>

Welcome to your new app.

<SurveyPrompt Title="How is Blazor working for you?" />
Now, it’s time to run our solution!
To make this work, both the MVCCore and MVCFx projects need to run at the same time. To do this, right-click on the solution, select Properties, then Startup Project, and then choose Multiple Startup Projects, as shown below.
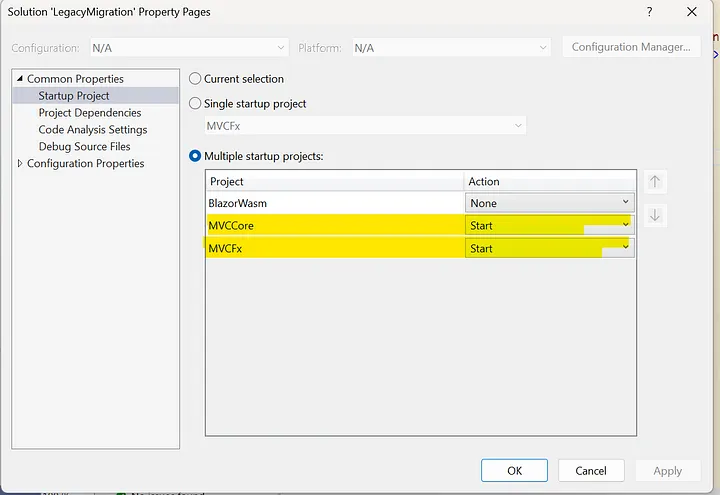
Now, you can run the solution as usual; both of the projects will run at the same time.
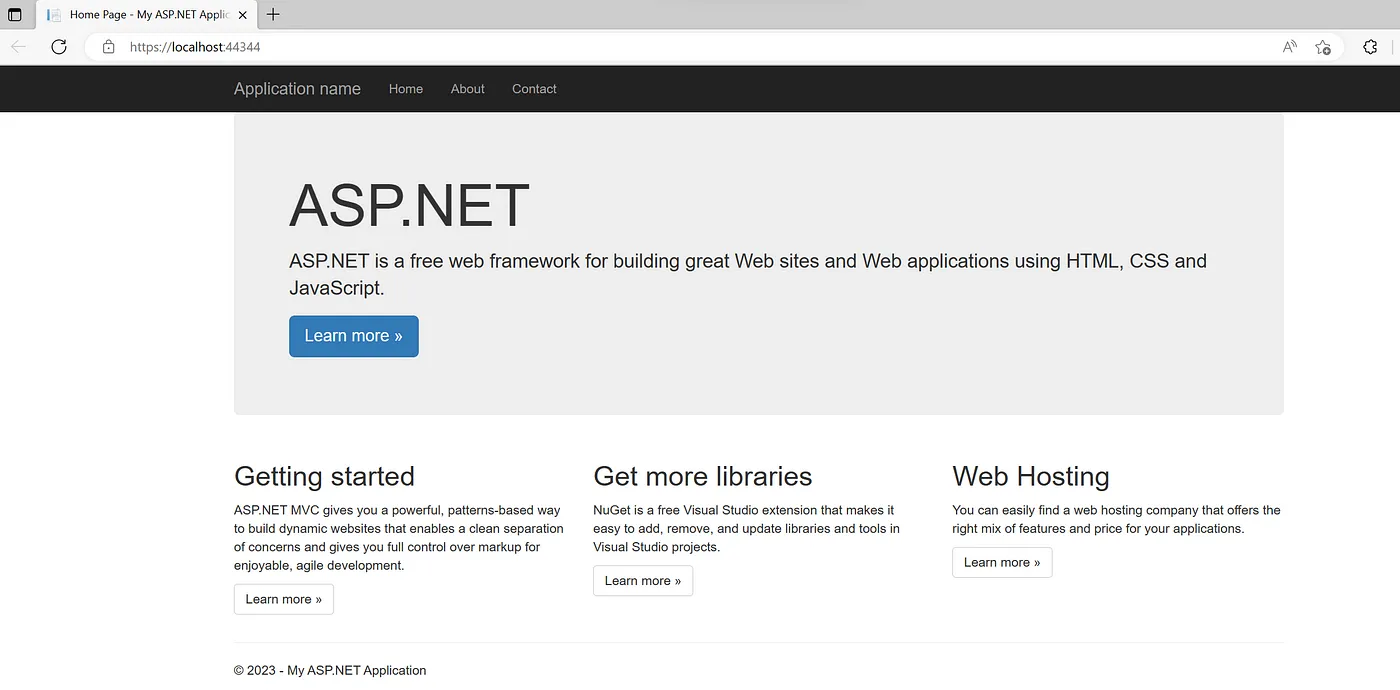
Go to the browser where the MVCFx is running; the home page is displayed:
In MVCCore app, navigate to /Home/Contact. We see the famous Counter component displayed!
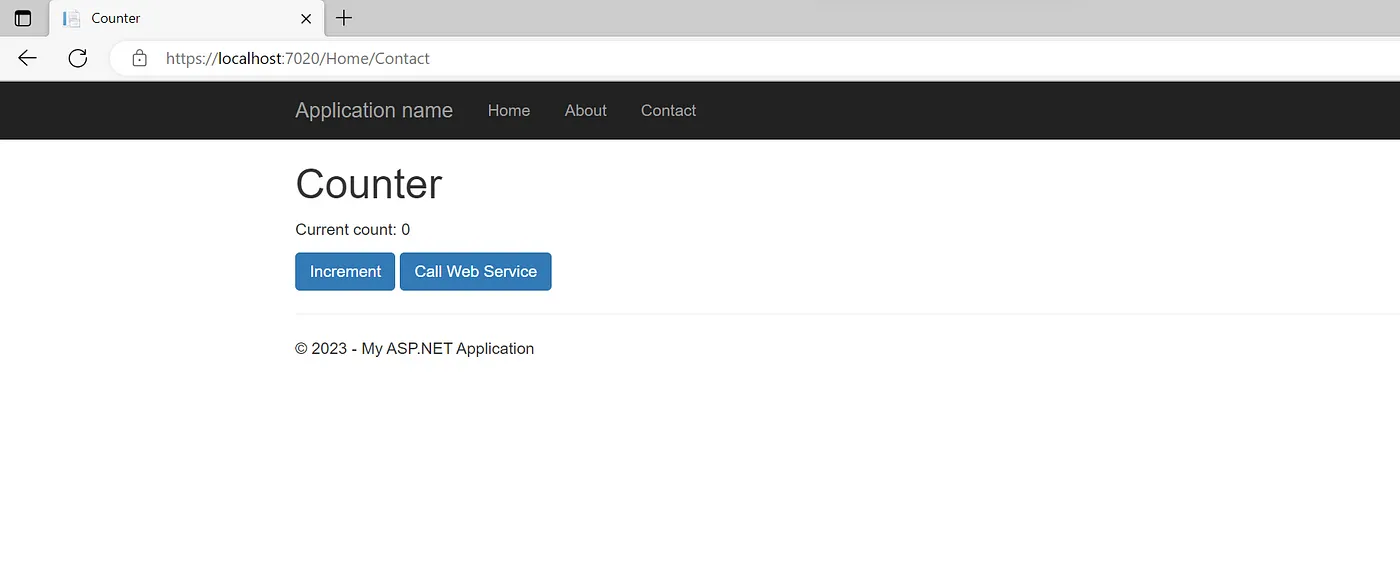
Now, here is how it works:
- When we try to access the page at
/Home/Contact, the .Net Core app won’t find the route configured, so, with the help of YARP reverse proxy, it forwards the request to the legacy site. - The legacy site will return the page since it exists on its side. Since we’ve activated Blazor for the page, the
blazor.webassembly.jsfile will be loaded (note that we didn’t need to copy anything for it to be available; the .Net Core app serves it as this one acts as the host for the Blazor WebAssembly app!), also since the page has the<div id="app"></div>, Blazor will render the App root component at this place. - Now, Blazor WebAssembly sees the current route
/Home/Contactand finds out it is available for the Counter Page so that it will be rendered! Nice huh? 😃
With this approach:
- DLLs Loading is more efficient. No needless redownload on each page load.
- Debugging works as it should since Blazor WebAssembly is served through .Net Core.
- No Cors issues when we perform AJAX calls to the API endpoints inside the .Net Core application since the request is made on the same domain.
Et voilà!
Maybe I missed some steps to make the above strategy work, but feel free to fork the repos of the solution and make some comparisons.
Bottom Line
In this blog post, we scratched the surface of how we could migrate from a .Net Framework MVC project to Blazor WebAssembly. Nevertheless, it is far from the whole picture for the migration, but as the Chinese philosopher Lao Tzu said: “The journey of a thousand miles begins with one step,” and if any first step needs to be made, it’d better be the good one. I hope this blog post inspired you to begin your long and challenging journey of legacy project migration.
Cheers!